Blocked drains are an absolute nightmare for your property. If you have a problem with your drains being blocked, you must fix it as soon as possible to prevent any lasting damage. Here you can learn how to use a drain rod to clear that blocked drain quickly and easily.
Table of contents
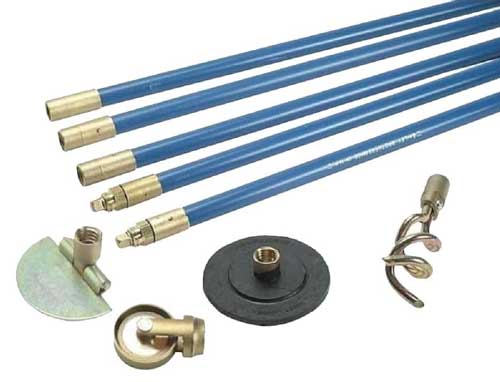
What is a drain rod?
A drain rod is a tool commonly used for unblocking outdoor drains. They are popular amongst professionals and DIYers alike and come with various attachments to use, depending on the type of congestion you’re dealing with. The most common is a plunger which can attach to the end.
Alternatively, if the blockage is stubborn, you can also opt for one or more of the following attachments to help you clear that obstruction:
- Corkscrew
- Harpoon
- Brush
- Hook
Rotating handles are also available if needed to make the process easier. Regardless of your desired attachment, this tool typically comes in the form of a drain rod kit. This provides you with all the options for every blocked drain eventuality.
Can I use my own existing drain rods?
Generally, it’s a good idea to purchase new drain rods if you’re not sure when they were last used. Especially if you’re borrowing them from someone and you are unsure how much use they’ve had, or how old their tools are. This is because there is a risk that the ends of the drain rods can fall off the rod or the rod can snap during use. Not great if you’re already trying to remove debris from the blocked pipe in the first place. You’ll likely have to spend additional costs for the removal of that piece of rod, too; we don’t want that!
How to rod a drain
Once you know where the blockage is, using a drain rod is simple and achievable in a few basic steps.
What you need:
- Drain rod sections
- Plunger
- Additional attachments (if required)
- Thick rubber gloves
- Protective glasses
- Protective overalls
- Face mask
- Bucket (to contain any debris pulled out from the drain for disposal)
Step one: Fit together the rods.
To use a drain rod, you’ll first need to assemble the rod. Take the separate pieces and attach them together. You should now have one long drainage rod. You can always remove or add sections as needed to suit the length of the pipe as you go.
Step two: Fit the plunger attachment to the end of the rod.
You should be able to easily twist the plunger on the attachment end of the rod. If you need different attachments for difficult blockages, remove and replace them as needed.
Step three: Remove the manhole cover, put on your protective gear and push the plunger into the blocked drain.
Here’s where you’ll need a bit of the old elbow grease. Drain rods are typically easy to manoeuvre thanks to their flexibility. So, you can effortlessly bend them around to find the opening of the pipe. Once you’ve done so, apply pressure to the plunger to help clear the blockage. If you’re using a corkscrew or similar, turn the rod clockwise to prevent the rods from coming apart.
Tip: Use the corkscrew or hook attachment first to remove the more stubborn parts of the blockage, if needed, then follow up with the plunger.
Step four: Clear up the area.
Once the blockage clears, you can use a hosepipe to wash away any leftover wastewater or debris after unblocking, then return the manhole cover. You should be able to notice there is a clear difference in your drainage by the water level.
It’s as easy as that! You’ll be able to clear the drain in no time.

Was this guide useful?
Mentioned in this project guide: