11th February 2026
Is traditional bathroom design just not cutting it? Fed up with being forced to choose between hot or cold temperatures during your cleaning routine? Then look to a mixer shower! Listen, with this attractive addition to your bathroom space, you can refashion your shower room and choose the perfect temperature for your showering needs.
Mixer showers are a popular modern alternative to the classic shower design. So, how do you fit a mixer shower in your home? Find out via our steps below.
Table of contents
What is a mixer shower
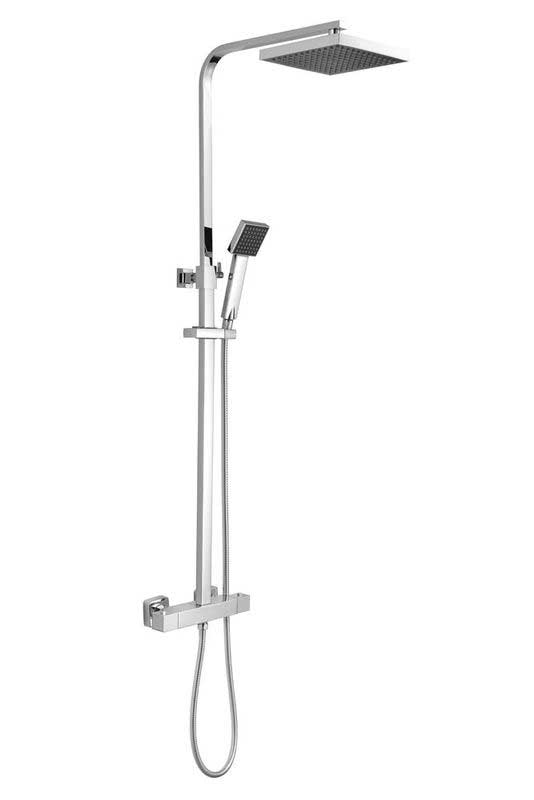
A mixer shower combines hot and cold water to give the ideal temperature. Not a fan of the extremes on either side of the temperature spectrum? You’ll love the mixer shower.
How does a shower mixer work?
As said above, mixer showers combine hot and cold water. The system works by connecting to both the hot and cold water supplies in the property. Instead of leading directly to the shower head, the different water temperatures meet at a valve and mix before flowing through to the outlet.
There are also different types of mixer showers, such as:
- Thermostatic – Controls the temperature and the flow of water from two controls.
- Double handle – Controls the temperature with separate hot and cold handles.
- Mechanical – Controls the temperature and flow of water from a single knob or lever (typically only usable on showers).
- Bar – Controls can be any of the mixer shower types mentioned above but must be contained in a modest design.
How to install a mixer shower
Before we get into the step-by-step guide on how to install your new mixer shower, you might be wondering how long it takes to install your new bathroom fixture. Luckily, it can be done within a day. For this type of shower, if you’re an experienced DIYer, set aside at least an hour to complete the installation.
What is the standard height for a mixer shower?
When discussing the height of a mixer shower, this refers to the height of the valve or shower controls. Typically, people have the valve around chest height, but you can also test the placement by constructing the overhead plate and finding where the bottom of the pipe on that section ends to locate the final placement of the valve.
For a good baseline of what height you need your shower valve:
- A minimum of 28 inches above the shower floor is recommended for bathtubs with shower units
- A minimum of 30 inches above the shower floor is recommended for a shower unit without a bathtub.
Having said all this, it’s important to know that the average height of a shower can vary depending on your requirements. You don’t want to put a valve too high or uncomfortably low to reach. Especially when there are people of varying heights in the household. So, measure up to see what’s best.
What water pressure do I need for a mixer shower?
Mixer showers heavily rely on water pressure to ensure they perform efficiently. So, when you connect your system, ensure the water pressure is at a minimum of nine litres per minute.
Installing a mixer shower
Before you begin, you need specific tools and equipment to get started.
What you will need:
- Mixer shower kit
- Pipe cutter
- Adjustable spanner
- Spirit level
- Tape measure
- Screwdriver
- Marking tool (i.e., pencil)
- Double-sided tape (if required)
- Drill (water-cooled advised for perfect holes or tile drill if needed)
- Compression olive
- Tee section
- Copper pipe and pipe connectors (if required)
Now to the fitting!
Step one
Choose which water supply you want the hot and cold water to come from. Above the bath, you can connect it to the tap’s water supply. For a separate enclosed space, find where the closest hot and cold pipes are and plumb them directly in.
Tip: Check under floorboards or inside cupboards for the hot and cold taps if put in an enclosed space.
Step two
Switch off the stopcock or main valve to isolate the chosen water supply, then drain the taps to ensure no water is rushing through to perform the fitting safely.
Step three
Insert a tee section into the hot and cold water supplies. Run the pipework towards the shower and check the instructions included with the valve to ensure the connections are on the right sides. Left for the hot and right for the cold.
Ensure you have a shut-off valve close to the shower by slotting it in a section of copper pipe at the end of the runs of the plastic pipe. This will make it easier to tighten the compression-type joints on a copper pipe. Once done, you can place plastic stop ends on the pipes and switch the stopcock back on to check for leaks in the newly added pipe runs.
Tip: Plastic pipes, inserted with pipe inserts to prevent deformities, can be put beneath the floorboards and up behind stud walls for a more secluded appearance.
Step four
You will need to intercept potential damage that can affect the shower valve. To do this, turn the water off and remove the stop ends. Place a bucket beneath the outlets and turn the water back on. Once the flush has finished flushing away, turn off the stopcock.
Step five
Put the shower valve against the wall where you want to fit it. Mark the amount of outlet pipe needed to ensure a flush fit to the wall. Then cut the outlet pipes to the required length using a close-quarter tube cutter.
Tip: If fitting a new mixer shower to replace an old one, you can typically use the same pipes and connectors for the new model.
Step six
Put the shower valve against the wall again and mark the holes where you need to drill. Drill holes for the valve. You will need to use a glass or diamond-tipped valve if drilling into tiles. You can also use a water-cooled drill to create perfect holes.
Step seven
Add a compression olive into each of the valve’s inlets, then screw the retaining nut on with one turn to secure the olive in place. Then align the valve with the supply pipes – ensure they are fully slid into the inlet pipes and screw the shower valve to the wall. Use an adjustable spanner to tighten up the screws, then turn off the shower valve and put the stopcock back on to check for leaks at the inlet pipes.
Step eight
Install the rest of the shower kit as needed. If the kit has a flexible hose, connect it and install the bracket that holds the handset. If the kit has a solid riser pipe, this may need cutting to length to adapt to the height of the ceiling. If so, ensure to measure the depth of the recess the pipe sits in on the valve and do the same with the bracket that will secure the top of the riser pipe.
Tip: Concealed shower valves can be taken to a wall or ceiling-mounted fixing shower head.
Step nine (if using a riser pipe)
Put double-sided tape on the top bracket, then stick this to the height needed above the shower valve. With your tape measure, measure between the bottom of the bracket and the top mounting nut on the valve, then add this final measurement to the total for the riser pipe. You can now cut this pipe as needed using a pipe cutter.
Step ten
Test the placement of the riser pipe between the valve and bracket. Use a spirit level to ensure it is vertical and mark off the top bracket mounting holes, followed by drilling and plugging.
Step eleven
The riser can now be fully fitted in place. Tighten the top and bottom nuts to ensure it is secure. If your kit has an extension piece, this will be attached to the riser’s top bracket to hold the shower head. Once the system is in place, check for leaks and ensure the thermostat is working accordingly, using the taps to confirm a constant temperature remains.
You are now the proud owner of a mixer shower!

Was this guide useful?
Mentioned in this project guide: