Bathroom cladding is becoming increasingly popular within the home. It’s a fast, reliable and waterproof solution for bathroom walls and ceilings. So, what is bathroom cladding? Why is it becoming so popular and how do you install bathroom wall and ceiling cladding?
Read on to find out more, and don’t hesitate to get in touch if you have any questions or queries.
Table of contents
- How to install bathroom ceiling cladding
- How to install bathroom wall cladding
- What is bathroom cladding?
- Why use bathroom cladding?
How to install bathroom ceiling cladding
When installing cladding on both walls and ceilings, we’d always recommend starting with the ceiling panels first to ensure watertight coverage.
For bathroom ceilings specifically, we’d suggest using wooden battens to provide a framework on which the cladding can be fitted.
Here are the steps you need to follow.
Step one: Create a timber frame
Cut your timber battens to size according to the length or width of your bathroom. Then fix the wooden battens at around 30-40cm intervals onto the ceiling. If desired, you can opt to double-batten the roof. This helps improve the ventilation in the bathroom, but it will lower the ceiling height, so it is not always possible. Once your timber frame has been fitted, check that it creates a level surface with a spirit level.
Step two: Cut and install edging trims
Next, cut the edging trims to ensure they fit the length of each wall. Then fit the edging trims on 3 sides of the room, ensuring they overlap in the corners.
Step three: Cut the cladding panel to size
The next step is to cut the first cladding panel to size before installing it onto the ceiling. When cutting the cladding, a simple saw can be used. Do try to keep the blade shallow to avoid rough edges. If working on a decorative panel, cut with the decorative face upwards when using a precise handsaw. If working with an electric saw, cut with the decorative face downwards.
Step four: Install the first panel
If working on a tongue and groove cladding installation, remove the tongue on the first panel – this will enable the panel to fit neatly into the edge trim. Slide the panel into place, ensuring it fits into both trims and screw or nail it into position. If needed, you can also apply adhesive to the back of the panel for extra security.
Step five: Install the rest of the panels
Now install the second panel, ensuring it fits into any edge trims as well as the tongue and groove connection of the first panel.
Continue this process until the ceiling is covered, and then fit the final edge trim. This should create a complete covering of cladding over the ceiling.
How to install bathroom wall cladding
When choosing your bathroom cladding, you can opt for square edge fixings or tongue and groove fixings. We’d recommend:
- using square edge fixings for shower panels
- using tongue and groove fixings for continuous panel runs
Bathroom wall cladding can be installed directly onto the wall if the wall is relatively level and even, or it can be fitted onto a frame of wooden battens.
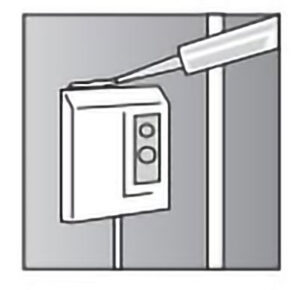
If working with square-edge fixings, use H-joint extrusions between each bathroom wall cladding panel. Use corner trims on each corner to create a complete seal. Ensure you leave a 3-4mm gap around all pipes and accessories, and seal these gaps with a bead of sealant.
Step one: Start at the corner furthest from the door
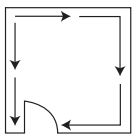
When installing bathroom wall panels, start at the corner furthest from the door. Panel in both directions around the room until you reach the doorway – the panel above the door will be the last panel put in.
Step two: Install the corner profile and the first panel
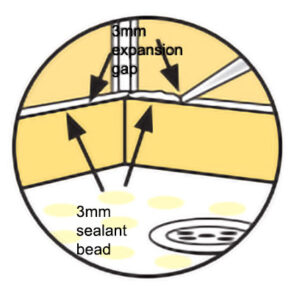
Firstly, install an internal corner profile into position by applying the shower panel sealant to the back of the profile. Then add adhesive to the back of the shower panel before applying it, allowing for a 3-4mm expansion gap. If working with tongue and groove fittings, ensure you’ve removed the first tongue section first.
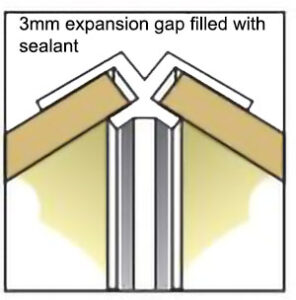
Step three: Ensure a 3mm expansion gap is left around the fittings
When working in wet areas, seal inside each profile trim before installation. Ensure that panels are fitted with a 3mm gap above baths, shower trays and floors. Then seal the expansion gap with shower panel sealant.
Step four: Continue installing panels
Now work outwards, panelling around both sides of the room. Ensure the panels are secured with shower panel adhesive and use shower panel sealant around each joint.
What is bathroom cladding?
Bathroom cladding, also known as bathroom panels, are sections of waterproof and hardwearing materials, typically PVC, that makes transforming a bathroom quick and easy.
Why use bathroom cladding?
There are several benefits of using bathroom cladding instead of more traditional wall and floor tiles.
Cost-effective
Firstly, bathroom cladding is generally cheaper than tiles and other wall coverings. This means it is a great way to stay within budget on a renovation or new build project. Replacing or creating all the walls within a bathroom may be considered quite costly, but when using bathroom cladding it is a great way to update the overall appearance of the bathroom without spending too much.
Easy installation
Another major benefit of bathroom cladding is that it is incredibly easy to install, and much less labour-intensive than installing numerous wall tiles. Learn more about how to install bathroom cladding below.
No grouting required
When installing bathroom cladding, the large panels remove the need to apply grout. Grouting is not only incredibly time-consuming but also a popular home for mould and mildew. By installing bathroom cladding, you remove the need for grouting, which in turn reduces the potential for mould and mildew to form, as well as preventing damp.
Hygienic
The completely flat and smooth surface means that not only is it highly unlikely that mould or mildew will form, but also that any dirt or grime build-up is easy to wipe off. This is another benefit of using bathroom cladding over tiles – the panelling is hygienic because not only is it unlikely to harbour mould, mildew and dirt, if it does, it is quick and easy to clean.
Insulating properties
Installing bathroom cladding or wall panels is also a good way to improve insulation within your home, particularly when compared with installing tiles. By improving insulation, you will not only save on energy bills but also make your home more efficient, and you can even improve soundproofing.